Pages

Wednesday 18 June 2014

Laserburn project WIP12 - Prefab subcontractor telecoms station and more toys

Some more toys. Kinder Hot Wheels surprise toys? In Aldi? At 49p, you say?
'Hmm, they can't be as big as normal hot wheels can they?'
No, they're not - that makes them perfect for 15mm, eh? Street scene? Car chase? - I'll have 12!
Ah good, one of each and three for conversions. Win.
The cars come in two bits and snap together. Stickers optional.
I'm not sure at this stage if they will be undercoated and painted, or if any of my washes will work on that surface. 

The Warbases HQ building is started.
It's had a white drybrush and some brown staining. The roof is WIP, but has so far been done with black wash, then black, white and two tones of grey POSCA markers. 
There are several panels on this. They're done in GOLDEN green gold high pigment ink. The idea of this odd colour is that is branding for the comms tower's corporation. I'll be putting branding on those.
The brick wall is the start of a pile of sacks or goods.
I intend to dirty up the precise lines on the roof, and put more prefab panel lines on the grey/white walls.

More soon.


Monday 9 June 2014

Laserburn project WIP11 - finished buildings, started buildings.

These astoundingly cheap Amera buildings have been a joy to paint.

In this post, I'll run you through how I did them, start to finish:

1: Purchase buildings. These are vac-formed, £1.50 for the small ones, £1.75 for the larger.
2: Raid your bitz boxes for suitable add-ons. Halford's grey primer.
3: Drybrush white all over, then follow that with a yellow ochre wash (Americana yellow ochre, thinned)

4: Brown ink wash. (Vallejo Game Color Smokey ink). Black inks pin washed into the windows and painted into shadowy areas (Chromacryl Black).


5: Highlight/drybrush with a mix of yellow ochre and unbleached titanium (Liquitex Heavy Body unbleached titanium)


6: More brown washing with smokey ink. Further highlighting with unbleached titanium

Paints I used in this process so far

7: Yet more inking

8: And here's the selection of paint markers I used to finish off the detail. I also scoured my decal envelope and added a selection of further details. Most of the decals are from old 1:100 Macross kits, the numerals by each door are from an original land raider.


Here's Building 1. The doorway effect is black and two brown tones. The paving slabs are all done with markers. The water effects is clear granular gel with an ink wash. The aircon (?) unit is from an old USS Grissom miniature

Building 3. I wanted the buildings 'the same but different'. Turning into a bit of a motto for me, that.
This building sports an alternative roof protrusion, and an odd solar panel thing with branding in an alien script. The alien decals are from Macross Zentraedi models.

Building 5 has something industrial going on at the top of their steps. The 'No step' decal is from some aircraft kit.

Building 7 is fairly bog-standard apart from that massive unit strapped on the side. It's an old Klingon d18 that got cannibalised at some point. The rear stairs feature a raised fin for some reason.

A view of the home improvements

Compare the stairs, the hilarious new game show.


Side walls


That's the finished buildings, now for the one I've started, you saw it flat packed in the second photo.

Phase one, make it, and stick more bits on.

Not sure about the green cap. I haven't stuck it yet, and I may mount something else there.

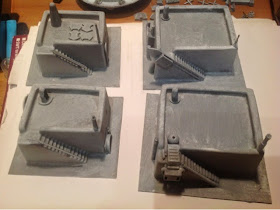
Phase 2: grey undercoat, ready for a similar treatment to the others.

Whilst we're on a Laserburn tip, some of the decals I got to complete my vehicles

So, four things off the painting table, which is looking a bit crowded at the moment.


More soon, lilliputian aficionados.


Thursday 5 June 2014

Xyston 15mm later Spartan Greek army WIP03 - Basing

For basing, I have pre-cut MDF sized for Impetus from Warbases.co.uk. I use GOLDEN texture gels for easy, ready-mixed goodness. For this project, I'll be using their 'clear granules' which has worked well on my 15mm Laserburn miniatures.
This shot shows the just-applied gel. Very white at the moment.
These are custom made sabots that I'll be using for my command group. The size is standard for a cavalry unit, but has six slots for oval sabots. As I'm only filling three of the slots at the moment, I've made three blank sabots too.
Also from Warbases, a nice 15mm bridge. I've applied some gel to cover the joins from the construction process.

Here you can see how the gel dries - mainly clear, but some of the denser areas remain white. No worries though, it will all get covered up with the paint and suchlike.
Finally for this instalment, I've given them an all-over wash of Vallejo Smokey Ink (also called 'Smoke' in other incarnations. This is a lovely pigment-rich chocolate brown. I've also added some slate chips for rocky outcrops, salvaged from a planter in town >:)

In the next update, I'll show the drybrush layers and their cumulative effects. Those riders might get on their horses too...

Wednesday 4 June 2014

Xyston 15mm later Spartan Greek army WIP02

Some more on this project.
Today I drilled all the hands on the cavalry, and made a start on their weapons. I also started on the basing.
Cretan Mercenary Archers, two units

Horses from one of the cavalry units

The spears are Xyston's 50mm leaf-tipped ones. Looking at the length of the Dory, they would seem to be way too long, as they're supposed to be 7-9'. For 15mm (though more like 18mm with scale creep), that makes them pikes. I'm going to cut them all in half, which on reflection I should have done before I painted a load of them.

Painting spears.

For painting, I found some expanded polystyrene, and stuck the points in for painting, which made the job a lot easier.


Tuesday 3 June 2014

Xyston 15mm later Spartan Greek army WIP01

Oh dear. I appear to have started yet another project.
I've just been on holiday, and there's nothing more relaxing than painting by the pool. 
These are Xyston 15mm Peloppenesian war era miniatures. I was given the box set as a gift waaay back, and they all fit, along with paints, glue, knife and brushes into a modest 25cm x 25cm x 15cm box. At Sheffield triples I supplemented them with some support units, so they went in too. The other 28mm Greeks are the aforementioned (in 28mm WIP02) Jason and the Argonauts miniatures from Foundry.
Production line.
 The four standing hoplites and the over-the-shoulder lad were done on my 6mm Greek project when I was last on holiday in 2011. The advancing miniature is from chariot, I think.
The four riders at the front are heavy cavalry in boiotian helmets and cuirass. I've painted them as mercenaries as I don't think the Spartans relied too much on cavalry at the time I've aimed for (418BC).
Just started on the 28mm figures I brought along for 'thematic light relief', much the same reason as I took the 15mm stuff I worked on when doing the 6mm project for. Painting multiples can be very tedious at times and I find a scale break can revitalise things.

I am back from my Internet-free holiday now, and I can report that although I completed a fair bit, I still have much to do. These may well progress alongside counterpart 28mm units in the other project. 

I have completed, bar varnishing;
8 Cretan archers
3 Spartan light cavalry
4 Spartan cavalry
4 Spartan mounted commanders
4 Mercenary heavy cavalry

A lot of cavalry there for an infantry-heavy army, but I wanted to cover options.

Undercoated, we have;
40 hoplites
4 psilioi
2 slingers

And in various stages of production;
4 hoplites
4 commanders and musicians
8 mercenary hoplites.

Still a lot to do, but it's going well.